
How to automate email reminders for customers with overdue payments
One way to keep your company’s cash flow positive is by sending email reminders to overdue customers. QuickBooks Online can automate this.
Most small businesses struggle with cash flow. How do you get customers to pay by the due date, or at least not long after? We’ve written about some of the possible solutions. Accept credit/debit cards and direct bank payments. Send statements regularly. Offer a discount for early payment if it makes financial sense for you.
QuickBooks Online offers another tool for accelerating incoming payments: automated reminders. If you set these up, you won’t have to spend so much time keeping up with past-due remittances. It’s easy to do, and you can personalize your messages. You can even do this manually if you come across an individual customer who needs a nudge.
What about reminders for yourself? QuickBooks Online doesn’t come with a to-do list that you can use to enter tasks that must be done. But there are still ways to tie a digital string around your finger so you don’t fall behind on your own critical chores.
If you feel like you’re being too intrusive by sending out payment reminders, think about how you feel when you receive one yourself. Often, a financial obligation has simply slipped your attention. You want to maintain a good working relationship with your vendors, so you might even welcome such an email or letter.
Setting Up the Automation
To get started, click the gear icon in the upper right corner. Under Your Company, click on Account and Settings. Click the Sales tab and scroll down to Reminders. Click the pencil icon way over to the right to open the options here, then click the on/off button next to Automatic invoice reminders to activate them. Click the down arrow next to Default email message for invoice reminders to open the template.
QuickBooks Online includes email templates for late payment reminders that you can edit.
If you’ve ever done a mail merge, this will look familiar to you. QuickBooks Online replaces the text in [brackets] with data from your company file. So it will prepare an email for every customer that is past due and replace the bracketed content with your own customer and company names and invoice numbers. Of course, you can choose not to personalize the emails, but it’s likely to be more effective if you do. Everything in the template can be edited, and you can check a box to have a copy sent to you.
Below this email template are three reminder-scheduling blocks. Click the button next to Reminder 1 to turn it on. You’ll see that you can set up a reminder to go out to customers either on the due date or a specified number of days (3, 7, 14, 30, or 90) before or after.
QuickBooks Online checks the due dates for your invoices and will automatically send the email reminder out to everyone who meets the criteria. If a customer record has an email address in it, a reminder will be dispatched even if you didn’t send the original invoice through email.

You can schedule automatic invoice reminders to every customer who meets the criteria you’ve specified.
To set up additional, different reminders, you can do so in the Reminder 2 and Reminder 3 blocks. When you’ve finished, click Save. You can always go back in and edit these. To see who received reminders, click on Sales in the left vertical toolbar, then Invoices. The word Reminded should appear in the Status column.
If you’d rather dispatch reminder emails manually, you can do so in QuickBooks Online. With the same Sales | Invoices screen open, click on the down arrow next to Receive payment at the end of the row and select Send reminder. If you want to send reminders to multiple customers, click the box in front of each name to create a checkmark. Click the down arrow next to Batch actions right above the table and select Send reminder.
Reminding Yourself
We wish that QuickBooks Online had a reminder feature like QuickBooks Desktop does, that greets you every time you launch the software and displays tasks that need to be done. But there are still ways to remind yourself that invoice and bill payments are running late. You just have to make a habit of checking certain data screens regularly. For example, you should be visiting:
The Business Overview element of the home page. There’s an Income graph that shows you how much money is tied up in overdue invoices (and open invoices).
The Invoices and All Sales screens that you can see by clicking on Sales in the left vertical toolbar.
Reports, like Accounts receivable aging detail, Open Invoices, Unbilled charges, and Unbilled time.
If you just started using QuickBooks Online this year and are struggling with it, we’re available to set up training sessions and answer questions. And, of course, we’re always here for longtime users, too. The COVID-19 pandemic is still affecting a lot of small businesses, and we understand you may be facing difficult issues. If we can help you better use QuickBooks Online to manage your finances, please contact us.

Do this to save time when bundling items in QuickBooks
Some things just naturally go together. If you manage a fast-food restaurant, for example, you probably sell similar combinations frequently, like a double cheeseburger, fries, and a soft drink. If you regularly sell the same groups of products, you can save time in QuickBooks by creating assemblies.
Some things just naturally go together. If you manage a fast-food restaurant, for example, you probably sell similar combinations frequently, like a double cheeseburger, fries, and a soft drink. If you run a car dealership, there are numerous ways to upsell your customers by adding accessories, maybe at a discount. Even very small businesses can bundle items. You might sell handmade jewelry and want to put together a package that includes cleaner and cleaning cloths for one price.
You can, of course, continue to sell all of those products separately. But you may find you can bump up your sales (and profits) by creating assemblies (sometimes called “kits”), bundles of items that are sold as one unit. You can build these automatically if you’re using QuickBooks Desktop Premier or above. Here’s how to do it.
Putting Items Together
If you’re already creating item records and recording product sales in QuickBooks, you probably already have Inventory turned on. If you don’t, open the Edit menu and select Preferences. Click Items & Inventory, then Company Preferences. Make sure the boxes are checked for the options you want.
QuickBooks has several options for dealing with inventory. You should check your Preferences before you start entering sales.
Haven’t started creating item records yet? We can help with that if you have questions about how QuickBooks handles this. In fact, we encourage you to contact us about this critical process, because some of the records’ fields may be foreign to you. If you want to try it on your own, open the Lists menu and select Item Lists. Click the down arrow next to Item in the lower left corner and then click New. The New Item window will open.
Since you’re going to be building assemblies, you have to create records for all of the products that will be included. So choose the Inventory Part option under Type. Complete the rest of the fields here and click OK.
Once you have enough product records created to start building assemblies, go through the same steps you went through to open the New Item window. Rather than selecting Inventory Part under Type, though, click on Inventory Assembly. Instead of defining a single item in this window, you’ll be choosing the components that will be included. This is your Bill of Materials.
You won’t have to complete every field in this window, but several are required. Give your assembly its own Item Name/Number. Then, so you know what you’ll be pricing, jump down to the Bill of Materials window and select the items that your assembly will include in the table provided. If you completed all of the fields in the product records, QuickBooks will fill in the other columns on each line except for quantity (QTY), which you must enter.
Enter the item name and quantity for every inventory part in your assembly, and QuickBooks will fill in the rest and calculate your total cost.
When you’ve completed the table for your assembly, enter the Total Bill of Materials Cost in the Cost field above it, then supply the Sales Price that you will charge. Select the correct Tax Code and Income Account. Then go down to the bottom of the screen under Inventory Information and select the appropriate Asset Account. You’ll also need to specify at what point new assemblies should be built (minimum and maximum). There are four other fields on this line that QuickBooks will fill out once you start building assemblies and selling them.
Building Assemblies
The hard work is over now. When you want to actually start building assemblies, open the Vendors menu and click Inventory Activities | Build Assemblies. Select the kit you want by opening the drop-down menu next to Assembly Item. The items you selected will appear in the table below. QuickBooks will also display the maximum number of kits you can build given the quantity of inventory on hand. Enter the number you want in the Quantity To Build field and click the Build & Close button.
Now, when you go back to your item record, you’ll see that QuickBooks has filled in the On Hand number to reflect the assemblies you just built.
QuickBooks will keep the numbers in the lower right corner of the assembly item record updated.
The process of building assemblies may feel a little foreign at first. And if you’re going to keep some on hand, you’ll need to pay extra attention to your inventory levels, which you can do by running the Inventory Stock Status by Item report. So, this is an area where you may need to consult with us. We’re available to go over inventory and assembly concepts with you, or any other element of QuickBooks.
Peak Advisers can help you create ways to save all kinds of time when you’re using QuickBooks.

How to maintain customer records in QuickBooks Online
Your customers are your company’s lifeblood. Make sure their records are thorough and up-to-date.
Your customers are your company’s lifeblood. The information here will help you make sure their records are thorough and up-to-date in your QuickBooks Online account.
When companies buy other companies, what’s often considered the most critical asset? The customer list. When a business is damaged and data possibly lost, which set of records do they most hope to recover? The customer list.
You probably spend most of your time in QuickBooks Online working with transactions and reports, but your customer records deserve equal time. If they’re incomplete or otherwise not maintained well, you lose time filling in the blanks when you’re trying to complete a task that requires complete customer profiles. Your searches and reports may not tell the whole picture. Your relationships can suffer, and you may miss out on sales opportunities.
QuickBooks Online provides excellent tools for creating and maintaining comprehensive customer and sub-customer records. Here’s a look at how it all works.
Moving Your Customer Data In
There are two ways to create customer records in QuickBooks Online. If you have an existing database in Outlook, Excel, Gmail, or Google Sheets, you can import it. This will save you an enormous amount of time, but it’s a challenging process. You select the file you want to import, and then you have to “map” it by matching the fields in your database to fields in QuickBooks Online. You’ll likely need our help with this.
To import a customer file into QuickBooks Online, you’ll have to “map” its fields. Peak Advisers can help you with this.
Your other option is to enter records manually. This is time-consuming, but the more information you can include about your customers from the start, the better. You can always edit your records to add, delete, or modify what you originally entered.
To get started, hover over Sales in the toolbar and click on Customers. Then click on New Customer in the upper right corner to open the Customer information window. The only field you’re required to complete is Display name as. You may want to do this if you have a new customer on the phone and you want to concentrate on the conversation. You can take notes about their contact information and fill in the record later, when you’re off the phone.
But wherever possible, as we’ve already said, complete as many fields as you can. You’ll enter name and billing and shipping address and phone number(s) on the opening screen. You can also supply contact details like fax number and website.
Creating Sub-customers
You’ll notice a checkbox that says Is sub-customer. QuickBooks Online lets you “nest” related records under the “parent” record. This can be an actual customer, but many people use it to document jobs they’re doing for the customer. So if you’re a contractor, for example, you might have sub-customers like Sun deck and Spa.
If you want to set up such a record, enter the job name and click in the box next to Is sub-customer. Two fields will open below that allow you to select the parent customer and to indicate the sub-customer’s billing status. The remainder of the fields will automatically fill in with the parent customer’s contact information.
You can set up jobs as sub-customers in QuickBooks Online
Supplying Details
When you’re setting up individual customers, you should add as much detail as you possibly can to each record, beyond basic contact information. QuickBooks Online’s record templates display a number of tabs running horizontally across the window. The most important of these are:
Tax info. Are the customers taxable or exempt? If taxable, what is his or her Default tax code? (If you haven’t set up sales taxes yet and need to, please let us help. It’s complicated.)
Payment and billing. Do they have preferred payment and/or delivery methods? Will you be assigning default payment terms, like Net 30 or Due on receipt? What is their Opening balance? If they’re brand-new customers who have never ordered from you, this will be $0.00. If they’re existing, active customers, enter any outstanding balance they have with you as of the date that you enter. This must be correct, to avoid any problems with the customers’ ongoing balances. Questions? Ask us.
Other tabs here are self-explanatory. When you’ve entered everything you can, click Save. The new record will now appear in the Customers list and will be available to select from the drop-down list in transactions.
There will be times when you have to refer back to these forms to answer questions. By maintaining detailed, accurate customer records, you’ll be ready to respond. If you have questions about any of the information requested, or about other elements of QuickBooks Online that are puzzling you, please contact us so we can set up a consultation.

The Snowball Effect: 10 things QuickBooks users can do for better workflow
We use the tools within QuickBooks as well as apps that help QuickBooks work even better when we get the Snowball Effect rolling for clients. This approach helps improve how their businesses run end-to-end.
The Snowball Effect is the idea of how something small builds momentum, grows bigger, and becomes significant. Imagine a little snowball getting big and powerful as it rolls downhill.
This is the approach Peak Advisers takes when we work with many of our QuickBooks clients who want to improve workflow in their businesses. An owner knows changes need to be made, but they just don’t have the time. We help them select the smallest opportunity for saving time and effort and fix it. Once resolved, we take that extra time and apply it to the next smallest opportunity until that issue is resolved. This is done repeatedly, and the results are impactful in terms of time and money savings for business operators. Read more here.
We use the tools within QuickBooks as well as apps that help QuickBooks work even better when we get the Snowball Effect rolling for clients. We help improve how their businesses run end-to-end.
10 ‘Snowball Effect’ actions to help improve workflow
Use a credit card and Bill.com to pay vendors. No need for filing 1099s.
Migrate to QuickBooks Payroll including QuickBooks Time to improve employee time reporting and improve the invoicing process. Some subscriptions allow you to get QuickBooks Time for free!
Accept payments via invoice and eliminate cash receipt processing.
Download bank transactions daily.
Create recurring transactions.
Create rules for bank downloads.
If you are using QuickBooks Online, seriously consider migration to QuickBooks Online Advanced which features automated workflows and projects. You will reduce management and follow up time.
Increase your internal controls by defining job roles and use QuickBooks Enterprise or QuickBooks Online Advanced to enforce segregation of duties.
Automate any imports into QuickBooks.
Using QuickBooks Desktop? Assign the typical account code to each vendor.
Peak Advisers can put any or all of these ideas into action to get things done with less effort and more quickly to make your business run better and easier to manage as it grows.

The Snowball effect helps QuickBooks users save time & money
The Snowball effect describes when something grows in significance or size and power at an increasingly faster rate. The concept works wonders for QuickBooks users when we help them implement workflow improvements.
The Snowball effect describes when something grows in significance or size at an increasingly faster rate. It’s also an approach we utilize at Peak Advisers to save our QuickBooks clients serious time and major money.
The name comes from imagining a Snowball rolling down a hill - it gets larger and larger with more snow and becomes faster and more powerful as it moves onward. The Snowball effect describes a situation that starts small and builds up increasing in power and momentum as it grows.
The famous advisor, Dave Ramsey, uses the term to describe how to efficiently reduce debt. Here’s how it works:
Pay the minimum on all debit obligations except the smallest.
The debtor pays the maximum amount it can against the smallest obligation each month until that small debt is paid off.
Once the smallest debt is paid off the next smallest obligation is selected.
It is the focus of maximum payments until it is paid off.
Well, you see how the Snowball Effect works. The pattern continues until debt is reduced or eliminated.
Snowball effect works for workflow improvements
The same concept applies in other areas of business including workflow improvements.
How often does an executive or owner say, “Oh we need to make all these changes, but we just don’t have the time?” When a client says this to Peak Advisers, we recommend the Snowball. E.g., Peak says, “Let’s pick the smallest opportunity for saving time and effort and fix it. Once resolved, let’s take the time saved and apply it to the next smallest opportunity and then resolve that one.”
We work with clients to do this repeatedly until the workflow in an organization is significantly improved. Let’s review some examples.
Let’s say you are a contractor, and your accountant spends considerable time the days before each payroll to make sure employees have reported their time, that the time is charged to the correct job, and once payroll is completed the accountant posts the costs and billable expenses to the correct jobs in QuickBooks.
This is not a small problem, but the Snowball effect can apply. Let’s start by improving time reporting.
Prevent payroll preparation panic
A time reporting system currently exists, but if we implement a system that allows the accountant to monitor and check on time reporting for each employee during the workday problems are addressed as they occur. Or as Peak thinks about it, real time training prevents payroll preparation panic.
Once the time worked is reported reliably, we address importing that data into QuickBooks and the payroll system with just a few keyboard strokes.
Then we address how to invoice customers most effectively for the reported time, send the invoices electronically and enable online payment.
Finally, we make sure that the payroll system is filing and paying payroll taxes without the accountant being involved.
This Snowball has eliminated a significant amount of work and increased income by increasing time reporting accuracy.
Here is another example.
Proper preferences save massive time
QuickBooks Desktop by default considers all bills and expenses billable. When Peak engages with a new Desktop client, this preference is one of the first things we check. Peak has worked with clients that for years unchecked the billable box each time a bill was posted. When Peak sees this problem, we show the client how to a change a preference so that bills are not marked billable by default. Thousands of minutes are saved each year and we then work with the client to use that time savings to make another improvement. This often means changing other preferences to improve the basic workflows in QuickBooks.
Automating data entry for QuickBooks is a game changer
In another example Peak has worked with a large user of QuickBooks to automate the import of data from other applications. Over the course of a year, Peak and the client worked together to go step by step in the elimination of human work replacing it with software work - software that is off the shelf code but implemented to the client’s specific needs. The client is now saving hundreds of hours of work across the organization each month.
There are many ways we can work to improve your workflow and the Snowball effect means it does not have to be an all or none proposition. We will work with you to correctly set up your QuickBooks. Then we can discuss additional automation and third-party apps that will do all of the following:
Increase accuracy
Improve internal controls
Reduce time required to complete tasks
Talk to us about your concerns. We can help you get the Snowball rolling and save time and money.
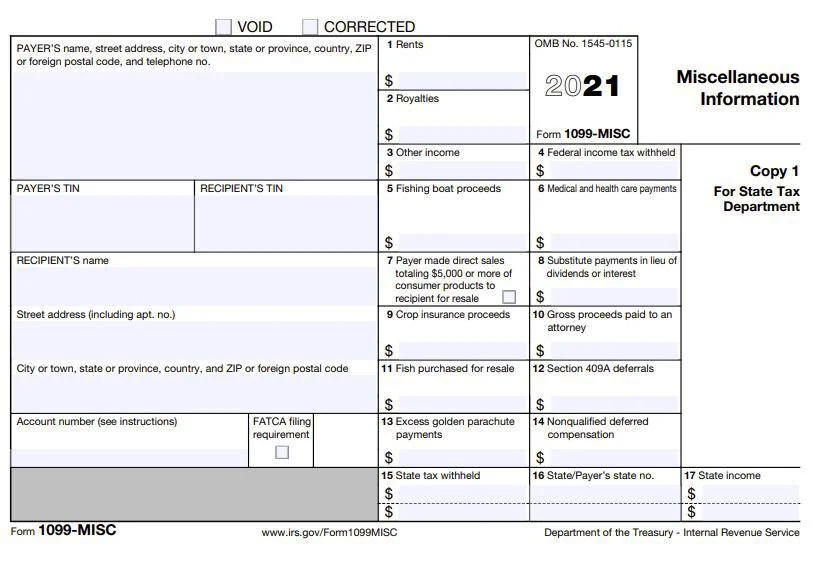
You may not need to file 1099-MISC tax forms
It is possible to never have to prepare, mail, or file a 1099-MISC tax form ever again. Read the blog to find out how.
Accountants’ phones start ringing off the hook in late January every year. Why does this happen? Because it’s 1099 tax form season and clients are asking for help to file 1099s. This happens despite most accountants encouraging clients, several times a year, to get ready for 1099 filing. The fact is, it is easy for QuickBooks users to file when there has been a bit of time spent organizing the Chart of Accounts and Vendors.
I get it. There is always something more pressing than identifying which vendors should receive 1099s and getting the necessary information from the vendors. Well, that’s until the 1099s are due in 48 hours! Then it is a priority!
No more 1099-MISC tax forms
So what if I told you it is possible to never have to prepare, mail, or file another 1099-MISC tax form ever again?
Interested in learning more? You should be once you think of all the time and money you will save, not to mention the aggravation that you just do not need or want in January each year.
But first, I must make it clear that Peak Advisers is not providing tax advice. Even though Peak Advisers believes what we are about to describe is accurate, you must consult your tax accountant before moving forward.
The current 1099-MISC instructions say this:
“Payments made with a credit card or payment card and certain other types of payments, including third party network transactions, must be reported on Form 1099-K by the payment settlement entity under section 6050W and are not subject to reporting on Form 1099-MISC. See the separate instructions for Form 1099-K.”
This has been the law since 2008. All that aggravation, all that time, and all that money spent could have been avoided if only you had paid all vendors with a credit card or via “third party network transactions.”
What are “third party network transactions?”
You know what credit card payments are, but what are “third party network transactions?” These are payments made by PayPal, Venmo, or Zelle, for example. They also probably include payments made by Bill.com and other accounts payable management payment networks.
What happens instead is these entities file a 1099-K tax form. What is a 1099-K you ask? The current 1099-K instructions say, “Form 1099-K, Payment Card and Third Party Network Transactions, is an IRS information return used to report certain payment transactions to improve voluntary tax compliance. You should receive Form 1099-K by January 31st if, in the prior calendar year, you received any of the following payments:
From payment card transactions (e.g., debit, credit or stored-value cards), and/or
In settlement of third party payment network transactions above the minimum reporting thresholds of :
Gross payments that exceed $20,000, AND
More than 200 such transactions.“
Those of you with exceptionally sharp eyes might ask, wait, what about when the payments are below $20,000 and less than 200 transactions, don’t businesses have to report those on 1099-MISC? The answer is no. If your business pays every vendor via credit card or “third party payment network,” no 1099-MISC is required.
There are a couple of additional points to consider here. First, Peak Advisers believes this also applies to tax form 1099-NEC but haven’t found anything authoritative. Second, consult your tax accountant. He or she needs to agree with this approach since that is the person who will represent you if the IRS asks about your 1099 tax forms.
But it is possible to never file 1099-MISC ever again. Or at least until the law changes again!
First published March 30, 2021.

Integration of these apps makes QuickBooks Online work even better
Are you finding that you need more flexibility in an area of QuickBooks Online? Maybe it’s time to try an integrated app.
Are you finding that you need more flexibility in an area of QuickBooks Online? Maybe it’s time to try an integrated app.
When you first started using QuickBooks Online, you probably found that it supplied the tools you needed to manage your accounting – and then some. But if your business has grown or become more complex, you may need more functionality and flexibility in one or more areas, like time tracking and billing.
There are hundreds of add-on applications that integrate well with QuickBooks Online in the QuickBooks Apps store, which you can find here. Many of these apps are free, but most have subscription fees. They’re designed to amplify the power of QuickBooks Online’s own features. The site will remain your home base, but you’ll have to learn enough about the add-on apps to understand how they work and how they integrate with QuickBooks Online.
Here are some of the most popular add-on solutions from the QuickBooks Apps site.
Expensify
QuickBooks Online allows you to record expenses. Its thorough form templates ask you for numerous details, like the vendor, product or service, amount, and billable status. Completed expenses appear in a table. You can run any of several related reports, like Expenses by Vendor Summary. If you use the QuickBooks Online mobile app, you can snap photos of receipts that are turned into expense forms by QuickBooks Online and partially completed with the receipt data.
Using the QuickBooks Online mobile app, you can snap photos of receipts and completethe expense forms provided.
But Expensify ($5-9 per month for one user) does more. It’s a robust expense management system that handles everything from receipt processing to next-day reimbursement. Where QuickBooks Online only supports basic expense tracking, Expensify allows you to create expense reports and follow them through multi-level approvals. It features automatic credit card reconciliation and expense policy enforcement, as well as bill pay and invoices/payments. Two-way synchronization with QuickBooks Online means you can work in either application and your data will be replicated in the other, as is the case with all of these integrated solutions.
QuickBooks Time
Formerly known as TSheets, this powerful time-tracking application builds on QuickBooks Online’s time management and payroll features. QuickBooks Time ($8-10 per user per month plus $20-40 monthly base fee) is now owned by Intuit, so it’s embedded directly in QuickBooks Online.
Your employees can track their hours on any device, from any location, and they will instantly be available in QuickBooks Online so managers can review, edit, and approve timesheets. That data can then be used in areas like invoicing, job costing, and payroll. Advanced features include scheduling capabilities, overtime monitoring, GPS tracking, and real-time reports. The Who’s Working window shows you where your staff members are working and what they’re doing, in real time.
Peak Advisers can help you implement QuickBooks Time for your business.
Method:CRM
Peak Advisers is also a partner with Method:CRM.
QuickBooks Online does a good job of helping you create profiles of customers and storing them for quick retrieval. But some businesses need more than that. They need true Customer Relationship Management (CRM). Method:CRM ($28-49 per month per user; discounts for annual subscriptions) is an excellent partner for QuickBooks Online in this area.

You can record and store customer details in QuickBooks Online, but Method:CRM adds true Customer Relationship management to the site.
When you integrate Method:CRM with QuickBooks Online, you no longer have to do duplicate data entry to keep track of your customers and their sales profiles and histories. You get a shared lead list and activity tracking (emails and phone calls), and your customer records contain the information a sales team needs, like customer details, interaction, transactions, and services performed. Leads are stored in Method:CRM until they’re customers, and you can track sales opportunities from a customer’s initial interest through the final sale.
2 more advanced integration apps for QBO
QuickBooks Online provides basic inventory-tracking capabilities, but if your business has more complex needs, an integrated application like SOS Inventory ($49.95-149.95 per user per month) should be able to meet them. Built for QuickBooks Online from the ground up, the application offers advanced features like sales orders and order management, assemblies, serial inventory, and multiple locations. We are certified in SOS Inventory.
And if you need more sophisticated bill pay, invoicing, and payment processing (with multiple automated approval levels) than QuickBooks Online offers, you might look into the highly-regarded Bill.com ($39-69 per user per month).
See more of our recommended apps that help QuickBooks work better here.
Growth is good, but challenging
We wanted to introduce you to a few of the hundreds of integrated apps available for QuickBooks Online because you should know that there are options for expanding on the site’s built-in capabilities. As your business grows, so does your need for more sophisticated accounting. QuickBooks Online may still be able toserve you well with the help of one or more of these add-ons.
You may also want to explore the possibility of upgrading your version of QuickBooks Online. We encourage you to consult with us if you’re outgrowing your version of QuickBooks Online. We can help you explore the options so you can spend your time planning for your company’s future instead of wrestling with your accounting application.
QuickBooks Tip: Custom fields help tailor QuickBooks for your specific needs
QuickBooks was designed to be used by numerous types of small businesses. Custom fields help you tailor it to meet your own needs.
QuickBooks was designed to be used by numerous types of small businesses. Custom fields help you tailor it to meet your own needs.
One of the reasons that QuickBooks is so popular is that it can be used by a wide variety of business types, from pet stores to landscaping companies to coffee shops. Many companies are satisfied with the software as is and don’t need to make any modifications.
But have you ever needed to include more information in your customer records? Do your transaction forms need an additional field or two? QuickBooks makes this possible by supporting custom fields that you can define for yourself. It’s not difficult to do, and it can help you, for example:
Generate more focused reports.
Make customer and vendor records more detailed.
Create records for similar-but-different inventory items.
Here’s how it works.
Changing QuickBooks Forms
You may already know that you can change the structure and content of some QuickBooks forms, including invoices, estimates, sales receipts, statements, and purchase orders. To see what’s possible, open the Lists menu and select Templates. Right-click on the screen and select New. Choose the form you want to create and click OK. You can make changes in the window that opens and click Additional Customization to make more modifications.
You have tremendous control over the content and structure of your forms in QuickBooks.
Creating Custom Fields for Records
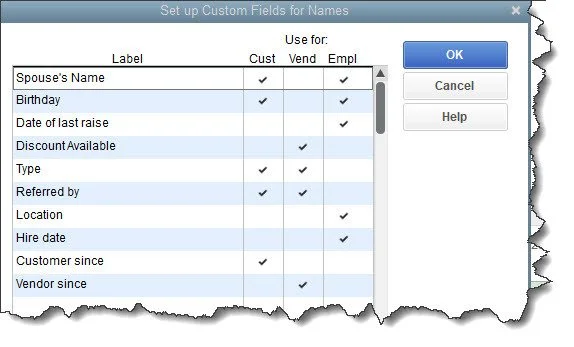
QuickBooks does not include custom field creation in the Basic Customization and Additional Customization windows, although your new fields will appear in the Additional Customization window. Rather, you go to the Customer Center, Vendor Center, or Employee Center, depending on what kind of records you want to change. You can add up to 15 custom fields for those three types of records (no more than seven per type).
Open the Customers menu and select Customer Center. Make sure the Customers & Jobs tab is highlighted. Double-click on any record to open its Edit Customer window and then click on Additional Info. In the lower right corner, click Define Fields. The window that opens displays four columns. In the first, Label, you’ll enter the names of your new custom fields. Click in any or all of the next three columns to indicate which records should contain them: customer, vendor, or employee.
You can create up to 15 custom fields in QuickBooks Pro and Premier, but you’re limited to seven per record type.
Think carefully about what custom fields you want to create before you start. Once you’ve defined them and started using them in records and transactions, you won’t want to change them.
Adding Custom Fields to Items
You can also add up to five custom fields to your item records. Open the Lists menu and select Item List. Select an item and double-click it to open its Edit Item window, then click Custom Fields over to the right. In the window that opens, click Define Fields. This feature works like the one we just explained for adding custom fields to contact records. You enter the Label name and click in the Use column to create a checkmark.
Using Custom Fields
It’s easy to enter information in the custom fields you’ve created in your customer, vendor, and employee records. You go through the same process you did to create them. Open a record and click Additional Info. You’ll see your new fields in the column to the right. Just enter the information in each record and click OK.
It’s easy to find the custom fields you’ve created and enter the appropriate information in each record.
As we said earlier, the custom fields you’ve created will be available to add to the appropriate form templates when you customize them. You’ll also be able to choose them as filters when you generate reports.
Dealing with Limitations
Obviously. QuickBooks’ custom fields have some shortcomings. You can probably work within the limits placed on contact records, but you may want to track more targeted information than the software’s limits allow when you’re dealing with items. If you sell t-shirts and you have a large inventory in different sizes and colors, for example, you’ll have to create an item record for each configuration rather than using custom fields.
You chose—or may be planning to choose—QuickBooks because it can work for so many types of businesses. Custom fields are one way the software provides to personalize its features. But there may come a time when you outgrow its capabilities. You might need to install an add-on application to deepen specific functional areas like inventory, or you may need to upgrade your edition of QuickBooks entirely. We can help when you reach this point. Please contact us if you need help with the program’s custom fields, or if it’s time for you to expand your current accounting system.

7 reasons why now is the time to start using QuickBooks Payroll
Whether you use QuickBooks Online or QuickBooks Desktop, it is time to make the change to QuickBooks Payroll. We have seven great reasons why you should start using QuickBooks Payroll.
Whether you use QuickBooks Online or QuickBooks Desktop, it is time to make the change to QuickBooks Payroll. Here are some great reasons why you should start using QuickBooks Payroll:
Powerful integration with QuickBooks Time, the timekeeping solution that will save hours on preparing payroll. Plus, depending on which version of QuickBooks you use, QuickBooks Time could be available to you at no additional charge.
The ability to access human resources department services with your own human resources expert.
Access to purchase benefits for your employees including 401k plans and health benefits.
The ability for all your employees to access the self-service portal WorkForce.
You can connect your QuickBooks Online Payroll to any worker compensation policy and pay premiums based on actual payroll, not estimates prepared at the beginning of the year.
Easily file W2 and contractor 1099 tax forms.
You can get same-day direct deposit.
For these reasons alone it is actually past time to migrate to QuickBooks Payroll. And you can get it done before January 1 if you act now. Contact us to discuss which QuickBooks products are right for your business.

QuickBooks tips: Guide to connect to your banks in QuickBooks
Importing your bank transactions into QuickBooks saves time, improves accuracy, and makes you a better money manager.
Importing your bank transactions into QuickBooks saves time, improves accuracy, and makes you a better money manager. This blog post guides you through the process.
It’s been a long time since your only options for learning about your bank balances and cleared transactions involved your telephone and your monthly statement. These days, accounting software and websites allow you to set up online connections to your financial institutions and download cleared transactions.
If you’re new to QuickBooks or you haven’t set up online banking yet, you may not realize how simple it can be (depending on your financial institution), or how safe it is. You can connect to one of your banks and import months of transactions in less than 10 minutes, depending on how active your accounts are, and again, your banks. And QuickBooks uses data protection that is similar to what banks themselves use. As long as you’re following personal security protocols on your own computer, you’re very unlikely to encounter problems.
Call Peak Advisers at (303) 801-4772 and we will be happy to help.
Online banking saves an enormous amount of time. It provides daily updates on your accounts, and if you entered the original transactions correctly, accuracy is assured. This real-time view of your finances can help you avoid money problems, make better business decisions, and plan for your company’s future.
Here’s how it works.
The Bank Feeds Center
QuickBooks provides the tools required to set up and maintain online banking in the Bank Feeds Center. To get there, open the Banking menu and select Bank Feeds, then Bank Feed Center. Click Add account in the upper right. QuickBooks will display a message saying it needs to close all open windows. Click Yes. In the Bank Feed Setup window that opens, select your bank from the list or enter its name in the search box if it’s not there.
Not every financial institution provides a direct connection to QuickBooks, but many of the major ones do. If yours does, you’ll see a window like this:
You’ll see a window like this if your financial institution is set up for direct connections to QuickBooks
Enter the user ID and password that you use to sign on to your bank’s website, then click Connect. You may be told that your financial institution needs more information. If that occurs, just follow the instructions. In our example, Discover Card wanted to send a temporary identification code as an email or text. Select your preference from the drop-down list and click Connect. Once you’ve retrieved your code and entered it, click Connect again. QuickBooks will open a window that displays your account(s) at the institution.
Now you have to tell QuickBooks where to download the transactions. Click the down arrow in the field under QuickBooks Accounts. You can select an existing account or create a new one. We want to create a new one here, so you’d click <Create New Account>. You may recognize the Add New Account window if you’ve done this before. QuickBooks already knew that this was a credit card account, so it pre-selected that option in the Account Type field. If you’re connecting a checking account, for example, you would probably want to select Bank. Enter an Account Name. If you want to make it a Subaccount of another account, check that box and select the parent account from the drop-down list (or add a new one).
When you set up online banking, you need to either create a new account in QuickBooks for each bank or credit card account or select an existing one.
The rest of the fields here are optional. You can fill in the description and account number if you’d like, but don’t assign Tax-Line Mapping or Opening Balance without talking to us. Just leave them for now. When you’re done, click Save & Close. Click Connect in the window that opens after you’ve made sure your new account is showing in the field below QuickBooks Accounts.
If all has gone well, you’ll get a message saying that your account has been added to QuickBooks. Click Close. Go to Banking | Bank Feeds | Banks Feeds Center again. In the field next to Bank and Credit cards, click the down arrow to see a list if your new account isn’t already showing and select it. Click the rotating circle in the blue card below to download your first set of transactions (or anytime you want to refresh the feed). This will typically bring in 90 days of transactions, depending on your financial institution.
Click the rotating blue circle anytime you want to download transactions from your bank.
There are many ways financial institutions interact with QuickBooks’ bank feeds. This was the simplest one. You might have to contact your financial institution to get QuickBooks Direct Connect set up (fees may apply) or you may have to go to your bank’s website and select the statement or transactions you want to move into QuickBooks.
Next month, we’ll talk about managing the transactions you’ve downloaded into QuickBooks. In the meantime, we’re happy to help you troubleshoot your bank downloads if you need help.

Record expenses in QuickBooks Online and in your phone
The money you spend to run your business must be recorded conscientiously for your taxes and reports. Here’s how to do it fast and easy in QuickBooks Online.
The money you spend to run your business must be recorded conscientiously for your taxes and reports. Here’s how to do it fast and easy in QuickBooks Online.
You undoubtedly keep a very close watch on the money coming into your business. You record payments as soon as they come in and deposit them in your company’s bank account. But are you as careful about your purchases?
It’s easy to go out to lunch with a client and forget to save the receipt. You figure it’s not that much money, anyway. Or you pick up a ream of printing paper and a cartridge at the office supply store and neglect to record the purchase. When you disregard even small expenses, you can have two problems.
Your books won’t be accurate.
You never know how an extra $42.21 under Meals and Entertainment might affect your income taxes.
QuickBooks Online provides two ways to enter expenses.
You can create a record on the site itself.
You can snap a photo with your phone using the QuickBooks Online mobile app to document the money spent.
Here’s how these two methods work. And remember, anytime you need help with anything related to QuickBooks, you can call Peak Advisers at (303) 801-4772.
Documenting At Your Desk
Let’s say you just had lunch with a vendor to discuss some products you’re planning to buy for a project you’re doing for a customer. You charged it to your company credit card, which you track in QuickBooks Online. You still have to enter it as an expense on the site so that when your credit card statement comes, you can match the credit card transaction to the expense you recorded.
Hover over Expenses in the navigation toolbar and click on Expenses. Click the down arrow in the New transaction button and select Expense. Fill in the fields at the top of the screen with details like Payee, Payment date, and any Tags you want to specify. Under Category details, select the correct category from the drop-down list and enter a Description and Amount.
QuickBooks Online allows you to thoroughly document expenses. You can attach a picture of a receipt if you’d like.
Since you’re going to bill this to the customer as a part of your project fee, click in the Billable box to create a checkmark. Select the Customer/Project. Add a Memo to remind yourself of the reason for the lunch (very important!) and attach a photo of the receipt if you take one. Click Save. Your record of the lunch will now appear on the Expense Transactions screen. It will also show up in the Expenses by Vendor Summary and Unbilled Charges reports, among others.
Recording on the Road
In the example we just went through, attaching a photo of the receipt was the last thing we did to record an expense in QuickBooks Online. There’s another way to document a purchase that starts with a photo of a receipt and should save you a bit of data entry: using the QuickBooks Online mobile app. The app uses Optical Character Recognition (OCR) to “read” the receipt and transfer some of its data to fields on an expense record. (If you haven’t installed the QBO app on your smartphone, you should. You can do a lot of your accounting work that synchronizes automatically with QBO. It’s free, too.)
Open the app and log in. On the opening screen, you’ll see an icon labeled Snap Receipt. Click on it, and your phone’s camera will open (you’ll be asked for permission to use it). Position your phone over the receipt and move it around until you see the blue box covering the content of the receipt. Take the picture. You’ll see it displayed on the phone with a message saying, “Use this photo.” If it seems OK, click the link.
A message on the screen will tell you that the upload is complete and that the app is extracting the information from it. Click “Got it!” It should only take about a minute for your receipt to appear in the list on the Receipt snap screen. You’ll see the details that the app has pulled from your receipt. Tap the matching expense and click Done on the next screen.
You can snap a photo of the receipt in the QuickBooks Online mobile app, and some fields will be automatically entered on a receipt form in QBO.
When you’re back at your computer, open QuickBooks Online and go to Transactions | Receipts. At the end of the row that contains your receipt, click the down arrow next to Delete and select Review. QBO will display the partially-completed receipt form next to the photo you took of the receipt. Fill in any missing fields and save the transaction. Click Create expense on the screen that opens. Then open the Expenses menu and select Expenses, and there should be an entry for the receipt you just added.
This tool isn’t perfect, of course. Every receipt has different fields in different places, and sometimes they’re just not very readable. But in our tests, the app picked up an average of four fields.
Documenting your expenses using one of these two methods is so important. It will help you remember why you stored the receipt and make your reports more accurate. As long as you’re categorizing each transaction correctly, it will also make your tax preparation easier and faster and ensure that you’re charging customers for billable expenses. And if you’re ever audited, your careful work will come in handy.
QuickBooks Online does expense management well, but there are enough moving parts in these recording tools that you may have some questions. We’re here, as always, to answer them.
QuickBooks 2022: New money management features, speed
QuickBooks 2022 is available and the improvements are important and dramatic when it comes to managing the money in your small business.
QuickBooks 2022 is available and the improvements are important and dramatic.
Intuit will now only sell its QuickBooks Desktop Pro, Premier, and Mac products as Pro Plus, Premier Plus, and Mac Plus subscriptions. QuickBooks Desktop Enterprise has been a subscription only product for a few years. Businesses will get the following benefits from having QuickBooks Desktop as a subscription.
Access to the latest version, with the most up-to-date features, security patches, and support for third-party operating system changes
Up to 38% faster, more reliable QuickBooks computing power (64-bit). QuickBooks Desktop 2022 can only be installed on computers running 64-bit Windows. This does not apply to Mac computers.
Unlimited customer support and data recovery at no additional charge (a $299.99 annual value).
Premium time saving and money management features.
Increased productivity with the QuickBooks Desktop mobile app.
The highlights of the new features in QuickBooks Desktop 2022 appear below. You can read more detailed information about these new features by using the link to the article by Laura Madeira with Firm of the Future.
NEW! Enhanced computing power (64-bit compliant)
Users can complete accounting tasks faster
NEW! Upload vendor invoices via mobile device and auto-create bills for review
Take a photo of a vendor bill using the QuickBooks Desktop mobile app or ask your vendor to email invoices directly to your customized QuickBooks email.
NEW! Pay bills online from within QuickBooks
If paying a vendor bill with a payment type that includes a separate processing fee, QuickBooks will create a vendor named Melio® and these charges will be added as a vendor bill. Services for this feature are provided by Melio.
NEW! Accounts payable approval process
Only available in Desktop Enterprise 22.0. Manage cash flow by defining a customizable approval process for vendor bills received.
NEW! Customize and email vendor bill payment stubs
Maintain professional and consistent communications by emailing customizable bill payment stubs to your vendors.
NEW! Attach documents to QuickBooks using a mobile device
Conveniently take a photo of document(s) with the QuickBooks Desktop mobile app. Or you can scan documents into the QuickBooks Desktop Attachment Center.
NEW! Choose from multiple customer email contacts
Efficiently choose email(s) from a drop-down selection of the emails associated with your customer’s record.
NEW! Add-on e-commerce integration powered by Webgility®
For QuickBooks Desktop users who have an online store.
NEW! Payment links for customer pre-payments
Request money from your customer as a “deposit” for services/products not yet provided without sending an invoice.
NEW! Instant deposits for QuickBooks Payments account users
Instantly deposit Merchant payments into the business bank account. See more about Payments here.
NEW! Next day direct deposit for QuickBooks Assisted payroll subscribers
Pay employees faster and keep funds in the business bank account longer; process payroll any time before 5pm (PT) the day before payday. See more about Payroll here.
All detailed information about the new features in QuickBooks Desktop 2022 are available in the article by Laura Madeira of Firm of the Future.